
Getting Your Classic Car Inspected After Restoration: A Simple Guide
A thorough post-restoration inspection ensures your classic car is safe, reliable, and ready for the road. Think of it as a final health check for your restored beauty – just like you’d want a doctor’s approval after recovery.
The inspection covers five key areas:
- Engine & Mechanics Check engine startup, idle quality, and operating temperature. Listen for unusual noises and watch for fluid leaks. The transmission should shift smoothly, and brakes must respond instantly.
- Electrical Systems Test all lights, gauges, switches, and the charging system. Modern upgrades need special attention to ensure proper integration with original components.
- Body & Paint Examine paint finish quality, panel alignment, and door/window operation. Look for signs of rust or body filler under fresh paint.
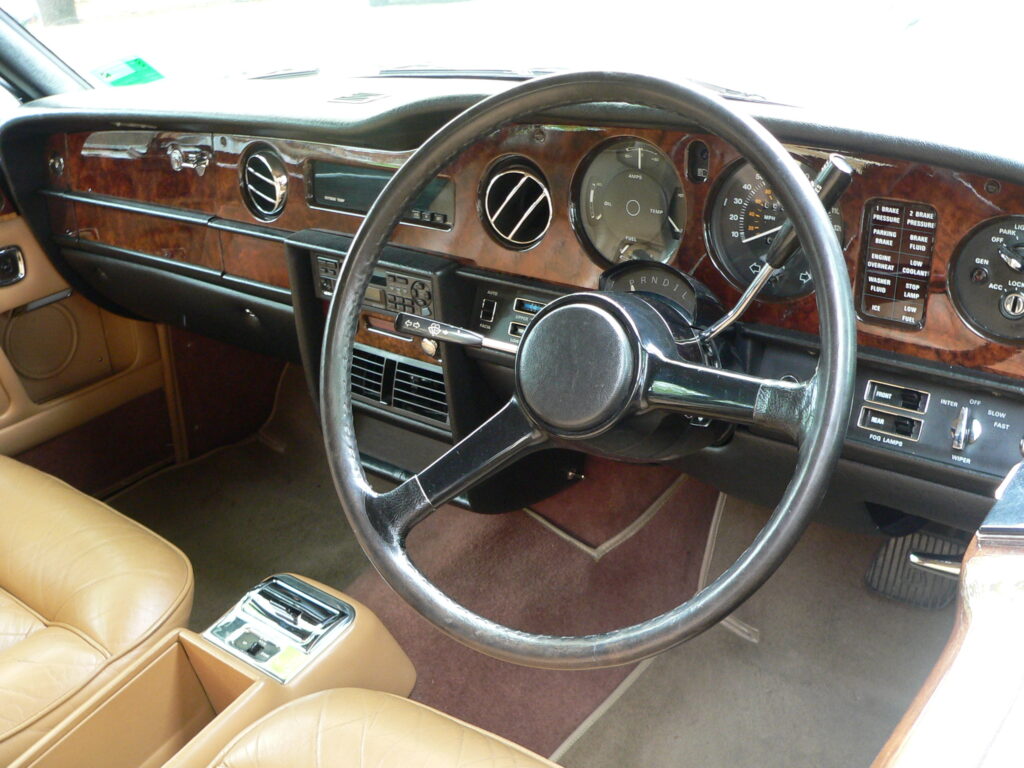
- Interior & Trim Verify seat security, working seatbelts, and proper dashboard function. Check weatherstripping, window seals, and interior fit and finish.
- Road Test Drive the car to test acceleration, braking, steering, and suspension. Watch for vibrations, pulling, or handling issues.
Professional inspectors document findings with photos and detailed reports, helping you address any remaining issues before regular use.
Evaluating the Engine and Drivetrain
Checking a Classic Car’s Engine and Drivetrain
A proper engine and drivetrain check helps ensure your classic car runs smoothly after restoration. Start by listening to the engine – it should purr without odd knocks or rattles. Check for oil leaks and measure engine compression to confirm the motor is healthy.
Test the transmission by shifting through all gears. The changes should be smooth, without grinding or delays. Look for clean transmission fluid and make sure the clutch engages properly. A well-functioning drivetrain means your classic car will drive like it did when new.
Key checkpoints: – Engine noise and vibration – Oil and fluid leaks – Compression readings – Gear shifting quality – Clutch engagement – Transmission fluid condition
These basic tests tell you if your classic car’s heart is running strong. Regular checks help catch problems early and keep your restored vehicle reliable for years to come.
Assessing the Suspension and Steering Systems
Checking the Suspension and Steering
A car’s suspension and steering keep you safe and comfortable on the road. Start by testing the shock absorbers – these are the parts that smooth out bumps and keep your tires firmly on the ground. Look for any oil leaks or worn-out shocks that make the car bounce too much.
Next, check the steering parts that connect your steering wheel to the wheels. Bad tie rods or loose ball joints can make steering sloppy or unsafe. Give the wheel a gentle shake – any clunking or excessive movement means repairs are needed.
Good suspension and steering mean better control, safer driving, and a smoother ride. If you spot problems, get them fixed before driving the classic car regularly.
Inspecting the Brake System and Components
Essential Brake System Inspection Checklist:
- Brake Pedal Test: Press the pedal with medium force. It should feel firm and responsive, not spongy or loose. A properly working pedal moves smoothly without sticking or requiring excessive force.
- Brake Fluid Check: Look at the fluid in the master cylinder reservoir. Good brake fluid looks clean and amber-colored. Dark, cloudy, or dirty fluid needs immediate replacement to prevent brake system damage.
- Visual Parts Check: Examine brake lines for cracks or leaks. Check brake pads for thickness (should be at least 1/4 inch). Look at rotors for deep grooves, rust, or uneven wear.
Regular brake inspections keep your classic car safe and prevent costly repairs. If you spot any issues during these checks, have a qualified mechanic examine the system immediately.
Checking Electrical and Lighting Systems
Checking Your Car’s Electrical and Lights: What to Look For
Your classic car’s electrical system and lights need a thorough check after restoration to keep you safe on the road. Start by looking at all the wires – they should be firmly connected, free from rust, and not showing bare spots or cracked insulation.
Test every light on your car: – Headlights (high and low beam) – Brake lights – Turn signals – Interior dome lights – Dashboard lights – Reverse lights
Watch for common problems like dim bulbs, flickering lights, or slow indicator blinks – these often mean there’s a wiring issue or weak connection that needs fixing. If you spot melted plastic around connections or smell burning, get help from a professional right away.
Keep your original wiring diagram handy (if you have one) to make troubleshooting easier and ensure everything is connected correctly. This helps prevent electrical problems that could leave you stranded.
Wiring Integrity Assessment
Checking Your Classic Car’s Wiring
Old car wiring needs careful inspection to keep your classic safe and running well. A proper wiring check helps prevent electrical problems and ensures all lights and accessories work correctly.
What to Look For: – Cracked or worn wire coverings – Loose or corroded connections – Signs of heat damage or melting – Proper fuse ratings and condition
Three Key Steps: 1. Safety Check: Test all connections and fuses to prevent fire risks and electrical shorts 2. Performance Test: Measure voltage at key points to ensure strong power flow 3. Quality Review: Look for worn spots, exposed wires, and outdated repairs
Quick Tips: – Test all lights and accessories – Check battery connections first – Replace any cracked or brittle wiring – Document all wire colors and routes
Regular wiring checks keep your classic car reliable and safe. If you spot problems or feel unsure, contact a classic car electrician for professional help. Good wiring means better performance and fewer roadside troubles.
Lighting System Functionality
Checking Your Classic Car’s Lights: A Safety Guide
Regular checks of your classic car’s lighting system keep you safe and legal on the road. Start by testing all lights – headlights, brake lights, turn signals, and interior lights – to make sure they work properly. Look for dim or burned-out bulbs that need replacing.
Next, inspect the wiring behind the lights. Old cars often have worn or damaged wires that can cause problems. Check for: – Loose connections – Cracked wire coating – Signs of rust or corrosion – Exposed wires
Fix any wiring issues right away to prevent shorts or failures. Good lighting helps you see better at night and lets other drivers spot you easily. If you’re not comfortable checking the wiring yourself, have a classic car mechanic do it for you.
A well-maintained lighting system means safer driving and fewer roadside troubles. Regular checks catch small problems before they become big ones.
Analyzing the Fuel System
A Well-Running Fuel System: Your Classic Car’s Lifeline
Regular fuel system checks keep your classic car running safely and smoothly. Three main areas need your attention:
- Fuel Lines: Look for simple signs of trouble like cracks or rust spots in the lines. Bad fuel lines leak gas – a dangerous safety risk that needs immediate fixing.
- Fuel Pump: A healthy pump delivers steady gas flow to your engine. When it fails, your car might sputter, stall, or not start at all. Listen for unusual noises or rough running, which often signal pump problems.
- Fuel Tank: Check for rust inside the tank and clean out any dirt or debris. A dirty tank clogs your fuel system and can damage your engine over time.
Quick Tip: Have a pro mechanic inspect these parts during regular maintenance to catch problems early and keep your classic car running reliably.
Reviewing the Interior and Upholstery
A classic car’s interior tells the story of its era through its design and craftsmanship. When checking a restored interior, focus on three key areas: upholstery, materials, and dashboard components.
Start with the seats – they should have even stitching and matching fabric throughout. Check that the materials match what the car originally had when it was first built. Real leather should feel and smell authentic, while vinyl or cloth should match period-correct patterns.
The dashboard needs special attention. All gauges should work properly, and any replacement parts should look like they belong in a classic car. Look for a crack-free surface and clear, readable instruments. Modern additions should blend seamlessly with the vintage style.
This careful inspection helps ensure your classic car’s interior stays true to its history while meeting quality standards for collectors.
Examining the Exterior Bodywork and Paint
Looking at a Classic Car’s Exterior: What to Check
Check these three key areas when examining a classic car’s exterior:
Panel Fit and Alignment Look at how the doors, hood, and trunk line up with the body. Good alignment means straight, even gaps between panels. Uneven gaps or mismatched panels often signal past damage or poor repair work.
Paint Quality Run your hand over the paint – it should feel smooth like glass. Watch for rough spots, different color shades, or bubble-like bumps. Fresh paint should match across all parts of the car. Dull or uneven areas might hide problems underneath.
Rust and Body Damage Check carefully for rust spots, especially in wheel wells, under doors, and along body seams. Small rust spots can grow into bigger problems. Look for wavy areas or ripples in the metal – these often show past repairs.
These simple checks help spot problems that could be expensive to fix later.
Verifying the Glass and Weatherstripping
Glass and Weatherstripping Inspection Guide
Check car windows and seals for common problems that affect safety and comfort. Look for chips or cracks in the windshield, side windows, and rear glass. Run your hand along the edges to feel if the glass sits flush in its frame without gaps or looseness.
Test all weatherstripping by gently pressing the rubber seals around windows and doors. Good seals are soft and flexible, while bad ones feel hard, cracked, or crumbly. Damaged seals let in water and wind noise, which can harm your car’s interior over time.
Quick inspection checklist: – Glass: Look for cracks, chips, distortion – Window fit: Check for proper alignment – Seals: Feel for soft, intact rubber – Door edges: Ensure complete contact – Weather test: Listen for wind noise
Replace worn seals and damaged glass promptly to protect your car and maintain driving comfort.
Ensuring Proper Tire and Wheel Alignment
Tire and wheel alignment is crucial for any classic car’s performance and safety after restoration. When your wheels are properly aligned, your car drives straight, handles better, and your tires last longer.
Three key alignment factors to check: 1. Camber: The tilt of your wheels from top to bottom 2. Caster: How your wheels balance front-to-back 3. Toe: Whether your wheels point inward or outward
Poor alignment leads to real problems: – Your car pulls to one side while driving – Tires wear out faster and unevenly – Steering feels loose or unstable – Fuel efficiency drops
Regular alignment checks save money and keep you safe. Get your alignment checked whenever you: – Install new tires – Hit a major pothole – Notice uneven tire wear – Feel steering problems
Pair alignment with wheel balancing to prevent vibrations and ensure a smooth ride. Good alignment and balance protect your investment in your classic car while making every drive more enjoyable and secure.
Frequently Asked Questions
How Often Should a Classic Car Be Inspected After Restoration?
Regular inspections every 12 months keep classic cars in top shape after restoration. These yearly checks help catch small problems before they become major issues.
A professional mechanic should inspect the car’s key systems – engine, brakes, suspension, electrical, and body condition. Between annual inspections, owners should perform basic monthly checks of fluid levels, tire pressure, and battery health.
Quick visual inspections before each drive help spot leaks, loose parts, or new issues. If you notice unusual sounds, smells, or performance changes, get the car checked right away instead of waiting for the annual inspection. This proactive approach protects your investment and keeps the classic car running reliably.
What Documents Should Accompany a Classic Car Inspection?
Essential documents for a classic car inspection include:
- Vehicle title and registration
- Service and maintenance records
- Original purchase documentation
- Current insurance papers
- Authentication certificates (if available)
- Previous inspection reports
- Restoration documentation (if restored)
Having these documents ready helps verify the car’s history, ownership, and maintenance. A complete paper trail increases the car’s value and makes the inspection process smoother. Keep all records organized in a folder, including receipts for parts and repairs. These documents tell the car’s story and prove its authenticity, which matters greatly to collectors and buyers.
How Does One Determine the Authenticity of Restored Parts?
Checking restored parts for authenticity comes down to three main steps: verifying original components, matching numbers, and reviewing documentation.
Original parts show specific signs of age and manufacturing methods from their time period. Look for maker’s marks, date stamps, and production codes that match the item’s era. Factory serial numbers should appear on matching components and align with historical records.
Documentation proves an item’s history and helps confirm genuine parts. This includes original purchase records, repair logs, and restoration photographs. Compare these documents with known authentic examples and manufacturer specifications.
Quality restoration work stays true to original materials and building methods. Check that replacement parts use correct period materials and construction techniques. Modern repairs should be clearly marked to distinguish them from original components.
What Are Common Post-Restoration Issues to Look Out For?
After restoration, watch out for these common issues in your classic car:
Paint problems show up quickly – look for bubbling, uneven spots, or areas where the color doesn’t match. Run your hand along the surface to feel for rough patches or ripples in the finish.
Mechanical issues need careful checking. Start the engine and listen for unusual noises. Test the brakes, steering, and suspension during a drive. Make sure all lights, gauges, and electrical parts work correctly.
Compare everything to factory specs and original documentation. Small problems caught early are easier and cheaper to fix. Regular inspections help maintain your car’s restored condition and protect your investment.
How Does Climate Affect a Restored Classic Car?
Climate directly affects your classic car’s condition and longevity. Hot and cold weather changes make car materials expand and shrink, which can damage paint, rubber, and metal parts over time. Moisture in the air leads to rust on metal surfaces and can ruin interior fabrics.
To protect your classic car: – Store it in a climate-controlled garage – Keep humidity levels between 45-55% – Use dehumidifiers in damp weather – Install a car cover when parked outside – Check regularly for early signs of rust
These simple steps prevent weather-related damage and help maintain your classic car’s value and appearance. Regular maintenance becomes even more important in areas with extreme temperatures or high humidity.