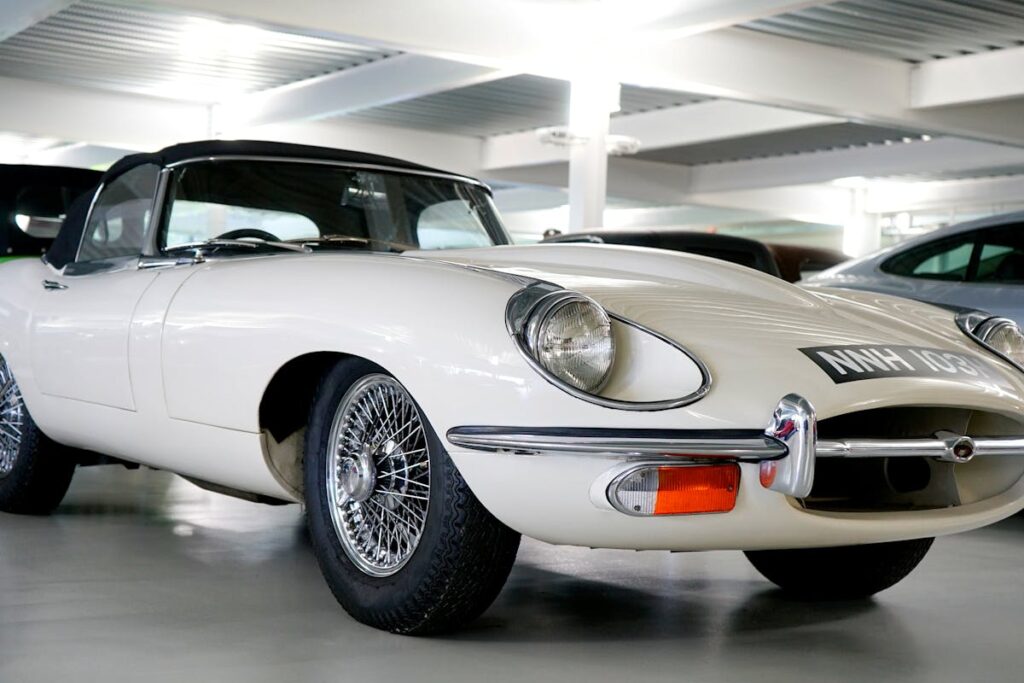
Classic Car Wheel Restoration: Essential Steps
Bringing old car wheels back to life takes careful work but doesn’t need to be complicated. The process starts with cleaning and inspecting each wheel for damage, rust, or worn parts that need fixing.
Key steps in wheel restoration: • Remove rust using wire brushes and chemical cleaners • Fix cracks and dents through welding or patching • Sand surfaces smooth, working from rough to fine grit • Prime and paint using correct vintage-matching colors • Replace worn bearings, seals, and lug nuts
The goal is to make wheels both safe and authentic-looking. Good restoration keeps classic cars running properly while maintaining their original charm. Each wheel needs individual attention – what works for one may not work for another based on age and condition.
For best results, gather the right tools before starting and take photos to track the original look. This helps match factory specifications when putting everything back together.
Understanding the Importance of Wheel Restoration
Wheel restoration makes a huge difference in both how a classic car performs and looks. Think of wheels as the shoes of your car – when they’re properly restored, they make everything look better.
Original wheels are vital pieces of automotive history. Each wheel design matches its car’s time period, from simple steel rims of the 1940s to the fancy alloys of later decades. Good restoration means: – Matching original specifications – Fixing damage and wear – Applying correct finishes – Maintaining proper dimensions
A skilled restorer carefully brings these wheels back to life while keeping their authentic features. This work does more than just improve looks – it helps preserve important pieces of car history. When done right, restored wheels make classic cars look complete and period-correct, just as they did when first built.
Keywords naturally grouped: wheel restoration, classic car, original specifications, automotive history, authentic features, period-correct
Identifying Common Issues With Classic Wheels and Rims
Common Problems with Classic Car Wheels: What to Look For
Classic car wheels can develop issues that affect both looks and safety. Two main problems stand out: wheel wobble and structural damage.
Wheel wobble happens when wheels lose their perfect roundness, causing an uneven spin while driving. This not only makes your ride less smooth but can wear out tires faster and affect how your car handles on the road.
Structural problems like rust, cracks, and metal weakness pose serious safety risks. Regular checks help catch these issues early. Look for: – Rust spots, especially around bolt holes – Hairline cracks in the metal – Bent or dented areas – Loose or missing parts
Quick action on these problems keeps your classic wheels safe and looking good. A proper inspection every few months helps catch issues before they become dangerous or expensive to fix.
Selecting the Right Tools and Materials
Successful classic car wheel restoration starts with the right tools and materials.
You’ll need basic tools like wire brushes, sanders, and measuring tools to get the job done right. For materials, invest in quality primers and paints that match your wheel’s specific needs – these make the difference between a lasting finish and one that quickly fades.
Choose your restoration method based on your wheel’s condition: • Sandblasting works best for heavily rusted wheels • Chemical stripping helps remove old paint and coatings • Manual sanding suits wheels in better condition
Quality matters most when picking supplies. Good tools and materials might cost more upfront but save time and money by helping you do the job once, correctly. Focus on proven brands and products recommended by experienced restorers.
The right setup leads to results that preserve both the wheel’s function and classic look. Remember: better tools mean better work, and better materials mean longer-lasting results.
Preparing Wheels for Restoration
Getting Wheels Ready for Restoration
Start with a complete wheel disassembly to ensure the best results. Take off the tire, hubcaps, and all nuts and bolts – this gives you access to every part of the wheel that needs work.
Check each part carefully for damage. Look for: – Bent areas – Cracks in the metal – Worn-down spots – Rust or corrosion
Take photos and notes of any problems you find. This helps you track what needs fixing and creates a clear plan for the restoration work.
A good inspection now saves time and prevents problems later. When you know exactly what needs work, you can tackle the restoration with confidence and get better results.
Remember: Missing small problems during prep can lead to bigger issues down the road. Take your time during this stage – it’s the foundation of a successful wheel restoration.
Removing Rust and Corrosion
Rust and corrosion removal starts with simple but effective cleaning steps to restore your wheels’ appearance and strength.
First, clean the wheels thoroughly with a wire brush to remove loose rust and dirt. Apply a chemical rust remover to break down stubborn spots – these products are available at most auto parts stores. For tough rust, sandblasting strips away deep corrosion quickly and effectively.
Next, brush on a rust converter containing phosphoric acid. This turns the rusty surface into a stable, black coating that prevents future rust. Add a protective zinc primer as a final shield against corrosion. For extra protection, especially in harsh conditions, consider cathodic protection systems that use electrical currents to stop rust formation.
These steps protect your wheels long-term while maintaining their classic look and performance. Regular inspection and quick action on any new rust spots will keep your wheels in top condition.
Repairing Damage and Imperfections
Fixing Classic Car Wheel Damage
Wheel repair on classic cars requires two main steps: straightening bent rims and fixing surface scratches. For bent rims, skilled technicians use controlled heat and pressure to carefully reshape the metal back to its original form. This process needs to be done slowly to avoid weakening the wheel’s structure.
Surface scratches need proper filling to look good and last long. Start by cleaning the damaged area, then apply matching filler material with special tools. Once dry, sand the area smooth and blend it with the surrounding surface. This creates a clean, seamless look that protects the wheel from further damage.
Quick tips for wheel repair: – Always check wheel alignment after straightening – Use fillers made specifically for wheel repairs – Test small areas first when applying new products – Consider professional help for deep or structural damage
Straightening Bent Rims
Bent Rims in Classic Cars: Essential Fixes
Bent rims need immediate repair because they make classic cars unsafe to drive and can damage other parts of the vehicle. A bent rim affects tire pressure, causes vibration, and creates uneven wear on your tires.
The straightening process involves: 1. Checking the rim’s damage level 2. Using special machines to apply controlled pressure 3. Reshaping the rim to its original form 4. Testing for proper alignment
Professional wheel straightening keeps your classic car authentic while ensuring safety on the road. The repair maintains the wheel’s strength without changing its historic look. Most rim repairs take 1-2 hours per wheel, depending on damage severity.
Pro tip: Check your rims regularly for signs of bending, like steering wheel vibration or uneven tire wear, to catch problems early.
Filling Surface Scratches
Surface scratches on classic car wheels are easy to fix with the right approach and tools. The repair process takes just a few simple steps to restore your wheel’s original beauty.
Start by cleaning the wheel thoroughly with soap and water to remove dirt and grime. Apply wheel filler (matching your wheel’s material) directly into the scratches and dents. Smooth the filler until it’s level with the wheel’s surface using a plastic spreader.
Once dry, sand the filled areas starting with medium-grit sandpaper, then switch to fine-grit for a smooth finish. End by coating the repaired spots with wheel sealant to protect your work and prevent future damage.
This repair method works on most wheel materials and helps maintain your classic car’s value and appearance.
Applying Protective Coatings
Protective coatings shield classic car wheels from rust and damage while keeping them looking beautiful. The two most popular options are powder coating and clear coat.
Powder coating creates a tough, long-lasting barrier that resists chips and scratches. Clear coat adds a glossy finish that protects against UV rays and harsh weather. Both coatings need proper preparation and careful application to work effectively.
To get the best results: – Clean and strip old finishes completely – Fix any damage before coating – Apply in a dust-free environment – Follow manufacturer instructions for temperature and curing time – Add multiple thin layers rather than one thick coat
Quality protective coatings, when applied correctly, preserve both the wheel’s strength and appearance, helping classic car wheels maintain their value for years to come.
Types of Coatings
Essential Coatings for Classic Car Wheels
Three main coating types protect classic car wheels while making them look amazing. Each type works differently and gives specific benefits for your restoration project.
- Powder Coating A dry powder sticks to the wheel using electricity, then gets baked on with heat. This creates a tough shell that won’t chip easily and keeps wheels looking fresh. Great for daily drivers and shows cars that need lasting protection. Choose from many colors to match your car perfectly.
- Chrome Plating Chrome gives wheels that mirror-like shine that’s perfect for vintage cars. The process adds a thin layer of chrome metal to your wheels, protecting them from rust while creating that classic showroom look. Chrome holds up well against weather and road wear.
- Clear Coat Think of clear coat as invisible armor for your wheels. It goes on top of paint or bare metal to block sun damage and keep the shine lasting longer. Clear coat makes cleaning easier and stops oxidation that can dull wheel surfaces.
Application Techniques
Proper Application Makes All the Difference
Getting a great wheel coating starts with the right prep work and application method. Clean the wheel surface thoroughly, then sand it smooth to remove any rust, dirt, or old finish. This creates the perfect base for your new coating to stick.
For best results, choose between spray guns for large areas or brushes for detail work. Apply the coating in thin, even layers – think of painting a wall in your home. Keep your strokes steady and consistent to avoid thick or thin spots.
Let each layer dry completely before adding the next one. Most coatings need 24-48 hours to fully harden. Don’t rush this step – proper drying time means longer-lasting protection for your wheels.
Remember: A clean surface, even application, and proper drying time are the keys to professional-looking results that last.
Long-term Durability
Making Classic Car Wheels Last Longer
Want to protect your classic car wheels for years to come? The right protective coating makes all the difference. The process is straightforward but needs careful attention to detail.
Start with the right coating for your wheel type – different wheels need different protection. Classic steel wheels work best with epoxy primers, while aluminum wheels need specific aluminum-friendly coatings.
Three Steps to Long-Lasting Wheels: 1. Match your coating to your wheel material – this keeps your wheels looking original while protecting them 2. Apply multiple thin layers rather than one thick coat – this prevents bubbling and peeling 3. Let each layer dry completely – rushing the process leads to coating failure
The right coating job protects against rust, road salt, and weather damage, keeping your classic car wheels strong and beautiful for years. Remember: proper preparation and patience lead to the best results.
Pro tip: Store touch-up coating for quick repairs to prevent rust from spreading.
Polishing and Finishing Techniques
Transform Your Dull Wheels to Shiny Showpieces
Simple polishing steps turn worn wheels into eye-catching classics. Start with a rough buffing wheel and compound to remove oxidation and scratches. Then switch to finer compounds for a mirror finish. Keep your movements steady and even to avoid creating swirl marks.
Apply quality metal polish in gentle circles to protect the surface and add extra shine. A quick inspection ensures you haven’t missed any spots. Remember: consistent pressure and proper technique matter more than fancy tools or expensive products.
Pro tip: Work in small sections and check your progress often. Good lighting helps spot areas that need more attention. The entire process typically takes 1-2 hours per wheel, but the results are worth the effort.
Related terms: wheel restoration, metal polishing, classic car maintenance, buffing techniques, wheel care, automotive detailing
Maintaining Restored Wheels and Rims
Keeping Your Restored Wheels Looking Great
Regular care keeps restored wheels shiny and protected. A few simple maintenance steps prevent damage and preserve your investment.
Storage Tips Park wheels in a covered space away from sun and rain. Use wheel covers or bags to keep dust off when storing extras. Cool, dry spaces work best for long-term protection.
Quick Inspections Check your wheels monthly for: – Scratches or chips – Signs of rust – Loose parts or bolts – Brake dust buildup
Basic Cleaning Clean wheels every 2-3 weeks with: – Wheel-specific cleaner – Soft microfiber cloths – Non-metallic brushes for tight spots – Clean water for thorough rinsing
Follow these steps and your restored wheels will maintain their showroom shine. Regular cleaning prevents brake dust damage, while proper storage stops environmental wear. Monthly checks catch small problems before they become expensive fixes.
Remember: Quick action on spots or damage helps avoid costly repairs later. Always use gentle cleaning tools to protect your wheel’s finish.
Frequently Asked Questions
How Do I Determine the Original Specifications of My Classic Car Wheels?
Finding Your Classic Car’s Original Wheel Specs
Check your car’s door jamb, glove box, or trunk first – many classic cars have a factory specs plate or sticker in these spots. Can’t find it? Get your hands on the original owner’s manual or workshop manual for your specific make, model, and year.
For reliable backup options: – Contact your car’s manufacturer’s heritage department – Join online forums dedicated to your classic car model – Check trusted classic car parts catalogs – Visit classic car clubs specializing in your make
Write down these key measurements when you find them: – Wheel diameter – Width – Bolt pattern – Offset – Original tire size
These details ensure you get the right replacement wheels that match your car’s authentic specs and maintain its historical accuracy.
What Is the Average Cost of Professional Wheel Restoration Services?
Professional wheel restoration typically costs between $100 to $200 per wheel, with the final price based on your specific needs.
Several factors affect the cost of wheel repair and restoration: – Wheel damage severity – Design complexity (simple vs. intricate patterns) – Material type (aluminum, chrome, alloy) – Required finish (powder coating, paint, chrome) – Local market rates
Basic repairs like curb rash or minor scratches fall on the lower end ($100-150), while full restoration of luxury or vintage wheels can reach $200 or more per wheel. Many shops offer package deals when restoring all four wheels, which can help reduce the overall cost.
Before choosing a service, request detailed quotes from local wheel repair specialists and ask about their warranty coverage for the restoration work.
Can I Restore Aluminum Wheels the Same Way as Steel Wheels?
No, aluminum wheels need different restoration methods than steel wheels. The materials require distinct approaches for the best results.
Aluminum wheels are softer and more delicate than steel, so they need special care during restoration. Use aluminum-specific cleaners instead of harsh chemicals that work on steel. Strong acids or abrasives can permanently damage aluminum surfaces.
Key steps for aluminum wheel restoration: – Clean with pH-neutral aluminum wheel cleaner – Remove oxidation with fine polish – Apply aluminum-specific sealant – Protect with wheel wax made for aluminum
Steel wheels can handle stronger cleaners and more aggressive sanding, while aluminum needs gentle, controlled treatment to prevent lasting damage. Using steel wheel methods on aluminum often leads to scratches, pitting, or cloudy finishes that are hard to fix.
How Long Does a Typical Wheel Restoration Process Take?
Wheel restoration typically takes 2-5 days for basic repairs and up to 2-3 weeks for complex projects. The timeline depends on three main factors: damage severity, wheel type, and restoration method.
A simple curb rash repair might take just 48 hours, while full refinishing with custom colors needs more time. Alloy wheels usually require longer than steel wheels because they need special handling and multiple finishing steps.
Quick breakdown of common timeframes: • Basic repairs: 2-3 days • Complete refinishing: 4-7 days • Custom work: 1-3 weeks • Vintage wheel restoration: 2-3 weeks
The shop’s workload and parts availability can also affect completion time, so always ask for a specific timeline when dropping off your wheels.
Are There Any Eco-Friendly Products for Wheel Restoration?
Yes, there are many eco-friendly products for wheel restoration that work just as well as traditional options. Green wheel cleaning products use plant-based cleaners, biodegradable solutions, and natural ingredients instead of harsh chemicals.
Popular eco-friendly wheel restoration options include: – Citrus-based cleaners that cut through brake dust – Biodegradable wheel soaps made from natural minerals – Water-based sealants and protective coatings – Chemical-free polishing compounds
These earth-friendly products protect both your wheels and the environment. They clean effectively while avoiding toxic runoff that can harm soil and water. Many also come in recyclable packaging and use sustainable manufacturing processes.
For best results, pair these products with microfiber towels and soft brushes to avoid scratching while cleaning your wheels naturally.