
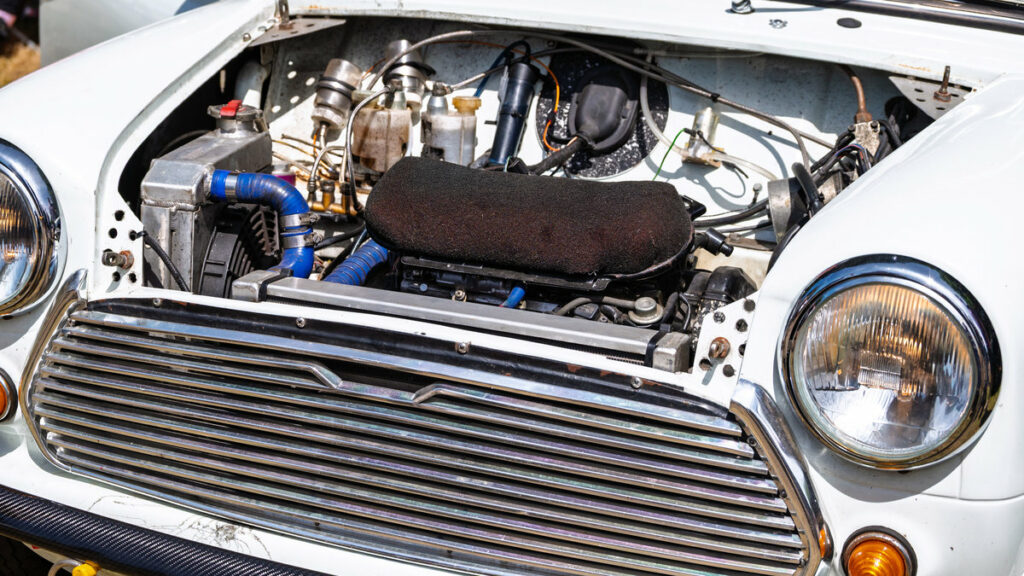
Classic Car Engine Detailing: A Step-by-Step Guide
Engine detailing keeps your classic car’s heart looking beautiful while protecting its value. The process combines thorough cleaning with preservation techniques that fight rust and prevent wear.
Start with basic degreasing: – Spray engine degreaser on cold surfaces – Let it sit for 5-10 minutes – Scrub gently with soft brushes – Rinse carefully, avoiding electrical components
Focus on key areas: – Chrome parts need metal polish – Painted surfaces require gentle cleaners – Rubber hoses benefit from protectant spray – Electrical connections need contact cleaner
Protection steps: – Apply metal sealant to prevent rust – Use heat-resistant paint where needed – Protect wiring with proper insulation – Cover cleaned surfaces with engine bay wax
Pro tips: – Take photos before starting to remember part locations – Work in small sections – Keep water away from distributor and alternator – Use compressed air to dry hard-to-reach spots
This systematic approach maintains authenticity while creating a show-quality engine bay that collectors value.
Understanding the Importance of Engine Detailing
Engine detailing keeps classic cars running better and looking their best. Think of it as a deep cleaning for your car’s heart – the engine.
Regular engine cleaning does three key things: – Prevents rust and wear – Helps spot potential problems early – Keeps the engine running cooler and more efficiently
When you detail an engine, you remove built-up dirt, oil, and grime that can trap heat and damage important parts. Clean engines run better, last longer, and are easier to work on when maintenance is needed.
For classic car owners, a clean engine also adds value to the vehicle and shows proper care. Just like washing the outside of your car, keeping the engine clean protects your investment and maintains the car’s history. Regular detailing makes it easier to spot leaks, loose connections, or worn parts before they cause bigger problems.
Essential Tools and Supplies for Engine Detailing
The Right Tools for Engine Detailing Made Simple
Basic cleaning tools and supplies make engine detailing easier and more effective. You’ll need:
• Cleaning tools: Soft-bristled brushes, microfiber cloths, and detail brushes for tight spots
• Cleaning products: Engine degreaser, all-purpose cleaner, and metal polish
• Protection items: Engine protectant spray, rubber/vinyl dressing, and disposable gloves
• Basic hand tools: Wrenches, screwdrivers, and pliers for removing parts when needed
Small brushes help clean narrow spaces between engine parts, while microfiber cloths prevent scratches on sensitive surfaces. Quality degreasers break down oil and grime quickly. After cleaning, protective sprays and waxes keep the engine looking clean longer and help prevent rust.
Keep these tools organized and easily accessible in your garage. Regular engine detailing with the right tools maintains your car’s value and helps spot potential problems early.
Preparing Your Engine Bay for Detailing
Before Detailing Your Engine: Essential Prep Steps
Getting your engine bay ready for cleaning is straightforward with the right tools and safety steps. You’ll need: – Soft-bristle brushes – Clean microfiber towels – Engine degreaser – All-purpose cleaner – Plastic bags and tape
Start by protecting sensitive parts. Cover electrical components, the alternator, and air intake with plastic bags and secure them with tape. This prevents water damage to crucial engine parts during cleaning.
Quick safety tips: – Work with a cool engine – Disconnect the battery – Keep water away from fuse boxes – Use gentle pressure when scrubbing
These basic steps help you clean your engine safely while maintaining its condition. The right preparation leads to better cleaning results and prevents damage to important engine components.
Essential Tools and Supplies
Essential Tools for Engine Bay Detailing
Getting your engine bay clean and organized requires the right tools and basic supplies. A well-detailed engine not only looks great but runs better and lasts longer.
Basic Tools You’ll Need:
1. Oil Filter: Pick the right size filter for your engine – check your owner’s manual for the exact type. Using the wrong filter can damage your engine.
- Fuel Lines: Check these rubber lines regularly for cracks or wear. Replace any damaged lines right away to prevent fuel leaks and keep your car safe.
- Cleaning Kit: You’ll want:
- Strong degreaser for tough oil and grime
- Soft-bristle brushes that won’t scratch
- Clean microfiber towels
- Garden hose or pressure washer
- Protective gloves
Regular cleaning with these tools keeps your engine looking fresh and helps spot potential problems early. Start with basic cleaning and work your way up to more detailed maintenance as you get comfortable.
Protective Measures and Techniques
Protecting Your Classic Car’s Engine Bay: Essential Steps
Before detailing a classic car’s engine, take these key safety steps to prevent damage. First, disconnect the battery and cover any electrical parts with plastic. This simple prep work keeps sensitive components safe during cleaning.
Choose the right products for your classic engine: – Oil-based lubricants protect gaskets and seals – Water-based cleaners remove dirt from paint and rubber – Period-correct products maintain authenticity
Classic engines need special care because their older materials can corrode easily. Using the proper cleaning supplies helps preserve your engine’s original features while keeping it in top condition. Always match cleaning products to your car’s specific materials to protect its historic value and keep it running smoothly.
This careful approach to engine detailing protects your investment and maintains your classic car’s value for years to come.
Techniques for Cleaning and Degreasing
Cleaning and Degreasing Your Classic Car’s Engine
A clean engine runs better and lasts longer. These simple steps will help you safely clean your classic car’s engine compartment without damaging any parts:
- Start Gently: Spray the engine with a mild, car-safe cleaner. This loosens dirt and oil without harming old parts. Let it sit for 5-10 minutes to break down the grime.
- Clean Thoroughly: Use a brush or pressure washer on low setting to remove grease. Work from top to bottom, paying special attention to corners and tight spots where dirt collects.
- Rinse and Dry: Spray clean water to wash away all cleaner and dirt. Use compressed air or clean towels to dry everything completely to prevent rust.
Quick Tip: Cover electrical parts with plastic bags before cleaning to protect them from water damage. Remove the covers only after the engine is completely dry.
Polishing and Protecting Engine Components
Polishing and protecting your engine parts keeps them looking great and lasting longer. Let’s break down this essential maintenance process into two simple steps.
First, polishing removes surface imperfections and creates a shiny finish. Use fine polishing compounds with a clean microfiber cloth or polishing wheel. Work in small sections, applying gentle pressure until you achieve the desired shine. Think of it like cleaning your car’s paint – steady, careful strokes get the best results.
Next, protect those polished surfaces with a high-quality sealant. Choose between wax-based products for classic engines or modern polymer coatings for newer ones. These protective layers guard against rust, moisture damage, and heat stress. Apply the coating evenly and let it cure completely before starting the engine.
Regular polishing and protection extend engine life and maintain its appearance, making maintenance easier and preserving your engine’s value.
Restoring and Painting Engine Parts
Restoring Engine Parts: A Simple Guide
Old engine parts need proper cleaning and painting to look good and work well. The right paint job protects the metal and keeps your engine looking authentic.
Start by stripping the old paint with chemical cleaners that won’t harm the metal surface. Check each part for damage and fix any problems you find. This step matters because damaged parts can affect how your engine runs.
Paint Colors and Steps: 1. Clean and smooth the surface 2. Apply metal primer for better paint grip 3. Use heat-resistant paint in thin layers
Tips for Best Results: – Pick paint colors that match the original engine – Work in a clean, well-ventilated area – Let each layer dry completely – Choose quality paint made for engines
These steps create a finish that looks great and lasts long. The right paint job not only improves appearance but also helps protect engine parts from rust and wear.
Addressing Rust and Corrosion
Rust and corrosion can seriously damage your engine if left untreated. Regular inspection and proper treatment protect both your engine’s performance and value.
Start by checking all metal parts for rust spots, flaking, or discoloration. These signs warn you of developing corrosion problems. Common trouble areas include engine blocks, cylinder heads, and metal components exposed to moisture.
Remove rust using proven methods like: – Sandblasting for large areas – Wire brushing for smaller spots – Chemical rust removers for stubborn patches
After cleaning, apply protective coatings to prevent future rust. Use rust-inhibiting primers and high-quality paint designed for engines. Regular maintenance checks help catch early signs of rust before they become serious problems.
Remember: Prevention costs less than repair. Keep your engine clean, dry, and protected from moisture. Fix any leaks quickly, and store vehicles in dry areas when possible.
Wiring and Hose Management for a Neat Finish
Clean Wiring and Hose Management Makes Your Classic Car Look Better
Proper wire and hose organization is key to making your classic car’s engine bay look professional and period-correct. Neat cable routing does two important things: it keeps everything working properly and maintains the car’s original look.
To get the best results: – Route wires and hoses along natural paths in the engine bay – Use correct-style clamps that match your car’s era – Hide modern wiring where possible without compromising function – Group similar cables together using period-correct clips or ties – Keep high-temperature lines away from sensitive wiring
These simple steps help create an organized, authentic-looking engine compartment that any classic car enthusiast would be proud to show off. The difference between messy and well-managed wiring can dramatically impact your restoration’s overall appearance and value.
Effective Cable Routing
Clean Cable Routing for Classic Cars
Getting your classic car’s engine bay to look showroom-fresh starts with smart cable management. Good wire routing keeps your car running smoothly and looking great.
Main Steps:
1. Smart Paths: Run cables away from hot engine parts and sharp edges. This prevents damage and extends wire life.
2. Strong Support: Use correct clamps and ties that match your car’s era. This keeps wires firmly in place and looks authentic.
3. Easy Access: Route wires where you can reach them for repairs. Avoid placing them behind parts you’ll need to remove often.
Tips for Success: – Group similar wires together – Keep high-voltage wires away from sensitive electronics – Use rubber grommets where wires pass through metal – Leave enough slack for engine movement – Label main wire runs for easier maintenance
Proper cable routing not only makes your engine bay look professional but also prevents electrical problems and makes future repairs easier. Follow these basic steps to achieve both safety and style in your classic car restoration.
Hose Clamping Techniques
Proper Hose Clamping for Classic Cars
Getting your hose clamps right makes a huge difference in classic car restoration. The right technique keeps your engine bay looking clean and working perfectly.
Choose stainless steel clamps that match your hose size exactly. These clamps last longer and keep that authentic vintage look your classic car deserves. Make sure your hoses run straight when possible – too many bends can cause wear and leaks.
Position your clamps where they won’t get in the way of other engine parts or spoil the engine bay’s appearance. Good clamp placement means better access for maintenance and a cleaner look overall. Remember: straight hoses, snug clamps, and careful positioning create both safety and style in your restoration project.
Concealing Wiring Paths
Clean Engine Wiring: A Simple Guide
Making wiring invisible creates a clean, professional look in your classic car’s engine bay. Good wire management not only looks better but also makes maintenance easier and stays true to the original design.
Three key steps make wiring look neat and period-correct:
- Plan Your Routes: Follow factory wire paths where possible. Look for natural hiding spots behind engine components and along frame rails.
- Choose the Right Cover: Pick wire looms that match your car’s era. Black split loom works well for most classics and hides modern wiring effectively.
- Mount Securely: Use correct-style clips and clamps for your car’s year. Avoid modern zip ties or bright metal fasteners that stand out.
Remember: Neat wiring helps showcase your engine while keeping everything working properly. Focus on hiding wires where they won’t interfere with moving parts or heat sources.
Final Touches for a Show-Ready Engine Bay
Making Your Engine Bay Show-Ready
A clean, well-organized engine bay turns heads at car shows and proves your attention to detail. Focus on these key show-ready elements:
Period Accuracy Install correct badges, decals, and fasteners that match your car’s year and model. This shows authenticity and knowledge of classic car history.
Clean and Polish Remove all dirt, grease, and fingerprints. Polish metal surfaces until they shine under show lights. Check that all fluids are topped off with no leaks or stains.
Organize Components Arrange hoses and belts neatly, making sure they’re properly secured. This creates a tidy look while keeping everything functional.
Final Details Double-check that all parts are properly aligned and tight. A final wipe-down ensures your engine bay sparkles, making judges and fellow enthusiasts take notice.
Frequently Asked Questions
How Often Should Engine Detailing Be Performed on Restored Classics?
Engine detailing for restored classic cars should be done every 6-12 months, depending on how often you drive the car and where you store it. Cars kept in clean garages need less frequent detailing than those exposed to dust, moisture, or outdoor elements.
For the best results, clean your classic car’s engine: – Every 6 months if driven regularly or stored outdoors – Once a year if rarely driven and garage-kept – After any long trips or dusty conditions – Before car shows or special events
Regular engine detailing keeps your classic running smoothly and looking showroom-fresh. It helps spot potential issues early, prevents rust and corrosion, and maintains the vehicle’s value. Use gentle cleaners designed for classic cars and avoid harsh chemicals that can damage vintage materials or finishes.
Can Engine Detailing Affect the Car’s Performance?
Yes, engine detailing can improve your car’s performance when done correctly.
A clean engine runs more efficiently because dirt, oil, and grime can trap heat and strain engine components. Regular detailing helps your engine stay cooler and work better by removing these harmful buildups. Think of it like keeping your kitchen clean – everything works better when surfaces are free from grease and dirt.
Just be careful not to overdo it. Using harsh chemicals or pressure washing can damage sensitive parts like electrical connections and sensors. Stick to gentle cleaners made for engines, and avoid spraying water directly on electrical components. If you’re unsure, let a professional handle the detailing to protect your engine’s performance and value.
Are There Eco-Friendly Products for Engine Detailing?
Yes, many eco-friendly products are now available for engine detailing! Modern green cleaners and degreasers work just as well as traditional products but are safer for the environment.
These plant-based and biodegradable cleaners effectively remove grease, oil, and grime without using harsh chemicals. Popular options include citrus-based degreasers, enzymatic cleaners, and water-based solutions that break down engine dirt naturally.
When choosing eco-friendly engine cleaners, look for: – Biodegradable ingredients – Non-toxic formulas – Plant-based components – Zero VOCs (volatile organic compounds) – Natural degreasing agents like citrus oils
These products protect both your engine and the environment while delivering professional-grade cleaning results. Many are also safer to handle and produce fewer harmful fumes during use.
What Is the Cost Range for Professional Engine Detailing Services?
Engine detailing costs typically run between $100 to $400, with most services taking 2-3 hours to complete. The price depends on your car’s size and how dirty the engine is.
Basic detailing includes: – Degreasing the engine bay – Steam cleaning tough spots – Protecting plastic and rubber parts – Hand-cleaning hard-to-reach areas
Larger vehicles like SUVs and trucks usually cost more than compact cars. A very dirty engine or one that hasn’t been cleaned in years might need extra work, pushing the price higher. Some shops offer different service levels, from quick clean-ups to deep cleaning packages that include protective coatings for engine parts.
How Can I Prevent Future Rust and Corrosion After Detailing?
The best way to prevent rust and corrosion after detailing is to create a protective barrier between metal surfaces and moisture. Apply a quality rust-prevention coating to clean, dry metal surfaces. Spray WD-40 or similar water-displacing products on hinges, latches, and other exposed metal parts. These simple steps block moisture from reaching the metal and stop rust before it starts.
For maximum protection: – Clean surfaces thoroughly before applying protection – Focus on treating areas prone to water exposure – Reapply protective coatings every few months – Check hidden spots like wheel wells and undercarriage – Address any paint chips quickly to prevent rust from forming